Once again I say hi to my followers and Sharepoint fellows. Today I woke up with an urge to write about something that is always a pain in Sharepoint. The Master/Detail thing.
There is no direct way to implement a Master/Detail scenario in Sharepoint, yet I've been using a technique that is pretty simple to implement and very easy for the end user to understand.
As this requires some work, I decided to split it into two articles.
1. Create the Master/Detail relation and Master Forms
2. Update the new (Detail) item link and Detail Forms.
So in this article, I will show you how to create the Master/Detail relation and change the Master Table Forms to reflect it. Check it out how.
First lets pick a classic Master/Detail scenario, the Country to City relation.
1. Create the Master Table (Country)
First step, create a Custom List, name it Country and keep it with only Title Column.
2. Create the Detail Table (Cities)
Create another Custom List, name it City and add an extra Lookup column called Country and reference it to the County Master Table.
3. Add some Countries and Cities
In order to visualize the relation add some items to both tables.
You should end up with something like this:

Countries

Cities
4. Create a new Master Display Form
Ok, the tables are set, now the goal is to change the Display Form of the Country Table (Master Table), in order to show the Cities of the picked Country.
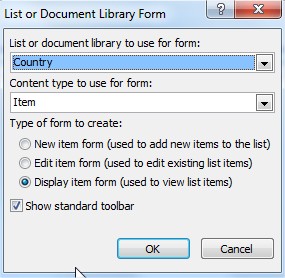
To do that, open your site in Sharepoint Designer and create a new Custom Form for Country Table and set it as default.

5. Create the Master webpart in the new form
Now open your newly created form, delete the existing DataFormWebPart and create a new Display Form, by using the Custom Form option. Like this:

You maybe wondering why I do this. Why the hell I recreated the WebPart. Well Sharepoint as a weird behaviour, bug or defect don't know. Yet, if you don't do this, whenever you add a new column to the table, you won't be able to add that new column without recreating the entire Display Form.
Now imagine, that you have a complex form, with several connected parts and some nice scripts and because you added a new column you now have to recreate the full thing (Won't go further, I'll discuss this issue in another article), just trust me recreate the WebPart :).
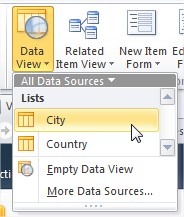
6. Add a Data View WebPart for the City Table
Just below the previous WebPart, add a Data View WebPart for the City Table. Like this:

You can remove the Country column if you wish.
7. Connect both WebParts
As you can see, the Data View WebPart is showing all the Cities. Now we need to connect both WebParts in order to show only the Cities for the selected Country.
Select the top WebPart (the one Displaying the Coutry) and click Add Connection and configure it as following:


Now save the form and its done.
PS: You might need to mark the created form as default again.

8. View a Country and its Cities.
Go back to your website and pick a Country, you should now see the Country item and its Cities.

All done for today, in the second article I will show you how to change the way you add and update Cities for a Country.
If you want to keep in touch, feel free to Subscribe to How I did it - Sharepoint Foundation 2010
No comments:
Post a Comment